This will be my last post here. I have been asked by Engineereed Efficiency to post my blogs on their site. Naturally, I jumped at this opportunity!
The plusses are:
1. More people will see my stuff (wider audience)
2. Personal gratification
The minuses are:
1. More people will see my stuff so it better be right (wider audience)
2. Personal humiliation.
So my posts will appear on the Civil3D.com site. I would like to think that my posts will still go on the SIMPLE side of Civil 3D. So I hope you'll still enjoy my posts from the new home.
Monday, May 4, 2009
Saturday, April 25, 2009
Partbuilder and Civil 3D 2010
I was very curious with the advent of ribbons on Civil 3D 2010 what they would do with Part Builder. Well, from what I can see - nothing! Part Builder looks and feels like it has now for several releases which is unfortunate.


If I were to take a poll on how many users feel confident with Part Builder, that number would be minuscule compared to their knowledge of, say parceling. I have heard some joke that you need a PhD to figure out Part Builder.

To get to Part Builder in Civil 3D 2010, You have to go to the Modify tab and Design panel. Select Pipe Network. The Pipe Networks contextual tab will appear (its blue). From the Network Tools tab, select the fly out on Parts List and you will see Part Builder.
I've played with it enough, like others to come to the conclusion that I'm an idiot when it comes to this part of the program and it shouldn't have to be that way! I was viewing the famous Lynn Allen's AutoCAD 2010 Tips screen cast and the part about parametric design had a real sour taste in my mouth with our present version of Part Builder. You see the very rich-laden ribbon for all those constraints - and the AUTO CONSTRAIN! Oh wow.

Oh Autodesk, why do you tease us? Maybe what we are seeing in AutoCAD 2010 is a foreshadowing of things to come to pass in future versions of Civil 3D. I (and others) hope so.
Friday, April 24, 2009
Civil 3D 2010 - Happy Arbor Day
In honor of Arbor day today, I thought I'd show you how to place Multiview objects (also known as MVBlocks), specifically TREES on a surface.
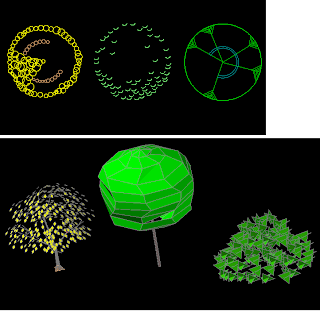
Before we get into how-to, I thought I spend a little time talking about the MVBlocks that are included with Civil 3D 2010. What you see in plan view can look very different in 3D view. These can work to our advantage in our Civil drawings.
 MVBlocks are not loaded on the palette by default - you have to hunt for them a bit. Luckily, its simple! You can open up the Tool Palette on the ribbon by the Home tab and Palettes panel. Select the second little icon. You can also use the shortcut CTRL+3 to open it up.
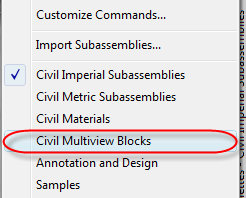
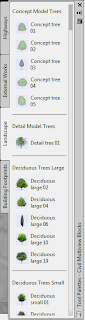
Right-click on the grey part of the panel that says Tool Palettes - (and then whatever type you are using; Imperial or Metric). Once you Right-click on that, click on Civil Multiview Blocks. Your Tool Palette will change. When you click on an MVBlock, Civil 3D will prompt you for an insertion point. This is nominally the center of the tree.
There are quite a number of MVBlocks that you can bring into your drawings. Cars, People, Playground equipment, and of course trees.
A couple words of advice though

So now that you have all these nice blocks into your drawing, how do you get them to show as they are on the surface? Very simple!
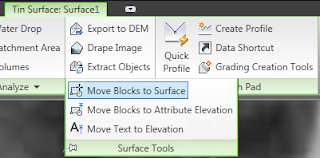
Click on the surface you wish to place the block on. The ribbon will change to a contextual state; that is all of the items in the ribbon are related to that surface only. Nice!
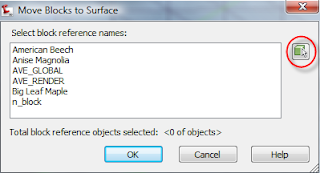
On the Surface Tools panel, click the drop-down arrow next to the Surface Tools. The menu will expand, showing you 'Move Blocks to Surface'. A dialog will pop up showing you all the blocks you have in your drawing. If you know the block names, you can select them from the list, otherwise, use the picker and pick the blocks individually.
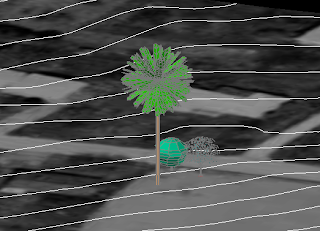
Once you're done with that, pick your surface and the trees and Object view them. You now have planted your trees!
I hope that each of use takes the time to actually go out and plant a tree, or do something outside in honor of Arbor day. If you cannot, well at least you've planted 'pixel trees' and your clients will like the additions to your renderings. Happy Arbor day.
Before we get into how-to, I thought I spend a little time talking about the MVBlocks that are included with Civil 3D 2010. What you see in plan view can look very different in 3D view. These can work to our advantage in our Civil drawings.
 MVBlocks are not loaded on the palette by default - you have to hunt for them a bit. Luckily, its simple! You can open up the Tool Palette on the ribbon by the Home tab and Palettes panel. Select the second little icon. You can also use the shortcut CTRL+3 to open it up.
Right-click on the grey part of the panel that says Tool Palettes - (and then whatever type you are using; Imperial or Metric). Once you Right-click on that, click on Civil Multiview Blocks. Your Tool Palette will change. When you click on an MVBlock, Civil 3D will prompt you for an insertion point. This is nominally the center of the tree.
There are quite a number of MVBlocks that you can bring into your drawings. Cars, People, Playground equipment, and of course trees.

A couple words of advice though
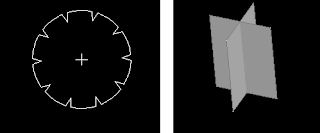
- Some of the MVBlocks are NOT 3D from the standpoint of us bringing in the block and viewing it via the Object viewer as indicated below. Case in point. Bring in any of the Deciduous Trees (large or small). They look fine in plan view but when you object view them, they look like some sort of abstract art (or from my eye - an extruded X).

- Some of the blocks come into your drawing at strange scales so if you really wish to use that block, you will have to do some experimenting. Case in point are the Deciduous Trees, Concept Trees, and Detail Trees. I'm not sure why they come in at these sizes but mine (and others) guesses are that they are throwbacks to the old DCA blocks.

- The Landscape MV Blocks all come in at a scale of 1 which is desirable since we can then scale the X and Y factor to the canopy width, and use the Z factor as the desired viewing height.

So now that you have all these nice blocks into your drawing, how do you get them to show as they are on the surface? Very simple!
Click on the surface you wish to place the block on. The ribbon will change to a contextual state; that is all of the items in the ribbon are related to that surface only. Nice!

On the Surface Tools panel, click the drop-down arrow next to the Surface Tools. The menu will expand, showing you 'Move Blocks to Surface'. A dialog will pop up showing you all the blocks you have in your drawing. If you know the block names, you can select them from the list, otherwise, use the picker and pick the blocks individually.

Once you're done with that, pick your surface and the trees and Object view them. You now have planted your trees!
I hope that each of use takes the time to actually go out and plant a tree, or do something outside in honor of Arbor day. If you cannot, well at least you've planted 'pixel trees' and your clients will like the additions to your renderings. Happy Arbor day.
Thursday, April 23, 2009
Civil 3D 2010 - HAPPY (google) EARTH DAY!
OK so it was really yesterday. What did YOU do to help our environment? Oprah had a segment on about the amount of trash that is ending up in our oceans - plastic, cans, refrigerators. We have GOT to be better stewards of our land or our sons, daughters, grandchildren will not have a fighting chance.


But enough about politics. I was playing around with the new Google Earth and decided to give a quick tour of its capabilities and Civil 3D 2010.
The latest Google Earth (as of this writing) is v5.0.11337.1968 and contains some pretty impressive things. You now have ocean view -you can take a tour underwater of the oceans. You can navigate to space and take a look at some of our neighboring planets - up close! You can download it here.
So what is and what isn't Google Earth? It is a good resource for getting mapping information. It isn't (or shouldn't) be used for design purposes as the contour information is basically USGS - 20' minor and 100' majors. And when you bring them into Civil 3D, they interpolate those in-between contours. It is good for getting a feel for the land for preliminary design work, drainage area mapping. Is isn't up to date. The view below is where I live! Note the lack of houses in that big field. And no, I don't camp out! :)

I have the right amount of area shown on my image that I want to import into Civil 3D. So I simply minimize Google Earth and open up Civil 3D 2010.

But before we get too involved here,let do some settings via the Settings. Google Earth is set by default to the Lat/Lon WGS84 projection. most of our work (in the States) is done via a State Plane. So Civil 3D has the 'smarts' to re project from their WGS84 into a projection set by us. Since I reside in South Central Pennsylvania area, my State plane is NAD83 Pennsylvania State Planes, South zone, US Foot or PA83-SF for the shortcut name. Once I set this information, any new data drawn, imported will be on this projection.

From the Insert tab and Import panel on the ribbon, I click on the Google Earth icon which has a fly-out. Our options are:
- Google Earth Image - This will import ONLY the image
- Google Earth Surface - This will import ONLY the surface and whatever your default surface style is set to. Out of the box, it is set to Contours 2' and 10' (Background).
- Google Earth Image and Surface - This will (you guessed it) import both the image and surface into your drawing.
- Google Earth Mesh - This command seems to be broken at present. A Service Request has been filed (you DO fill those out when you find something not quite right, do you???) Edit: Thanks to Bill Frederick of Synergis Technologies, the command is wrong in the CUI. If you type IMPORTGEMESH it works like a charm, the funny thing is the correct command is on the tooltip when you hover over it! If you edit the CUI and take out the AECC, the command works fine - I can blog later on CUI editing 101.
I want the image and surface. So after I select that, Civil 3D 2010 asks me once again to verify that I want the Google Earth projected into my projection. Yes I do.


And there you have it sports fans! An image and surface that is set to my projection. I can change the style of the surface to show anything I want now. I hope this might help you in your future google EARTH DAYS.
Wednesday, April 22, 2009
Welcome Screen - New Features and Best Practices
Today we're going to wrap up the Welcome screen so that in later blogs we can get into the meat of the program (simplified of course!)


New Features Workshop
This has been around for several releases now is provides a good overview of what's new. The nice thing about this is that you can actually see what's new in other releases too:
- Civil 3D 2010 - This is the default.
- AutoCAD 2010 - Always nice to see what's new here since all our programs are built upon this. It surprises me that very few actually know what is new in the plain AutoCAD releases that they can use to help simplify their life in civil 3D!
- Map 3D 2010 - Since Civil 3D is built upon Map, its nice to see what's new with this release. And of course, Map is built upon AutoCAD. See how they all relate?
- Civil 3D 2009
- AutoCAD 2009
- Civil 3D 2008
- AutoCAD 2008 - These last four are nice to know too. I've used them on occassion to find a certain new feature and trace back to when it was implemented.
But let's look at the Civil 3D 2010 Screen for a bit.
The menu is broken down into four areas:
- User Interface
- Creating, Drafting, and Editing
- Displaying and Visualizing
- Managing Data
Notice the ongoing theme with Civil 3D - Task based. Try them out and see What's new!
Best Practices Guide

When you click on this, you are opening a PDF file which can be printed out so you have a 'book' - but be forewarned that this book is 210 pages long! This guide is based upon the Autodesk developers, beta testers, and user feedback for what makes Civil 3D work in the most efficient manner. Along with recommendations are things to avoid too.
While this guide is just that; a guide or overview. It is not meant to be comprehensive. But it does a good job, and if you follow the suggested recommendations you will find that your Civil 3D will be happier.
So to wrap up the Welcome screen, it is a good resource for: those who are not familiar with the product, Those who need a quick refresher, and those who have been using it for some time but run into brain cramps. - In other words it's good for everyone!
Monday, April 20, 2009
Civil 3D 2010 - The case of the missing icons
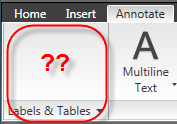
OK, so I closed my C3D 2010 down on Friday and start it up today. On the Annotate tab and Labels & Tables panel, the Add Labels and Add Tables icons are GONE! I can't even click in there thinking that perhaps they are just hidden - nope, they are GONE!
So, I start to think what is different from Friday to today. I stumbled up on this and I can reporduce it on my laptop and my workstation:
If you close C3D 2010 with the Anotate tab activate, restart C3D, the icons are GONE! If you change to the Home tab and close and reopen - go to Annotate tab, it is there.

So, I tried it with all the tabs and it seems like all of them do that.
So - until a fix or workaround is avaialble, remember to switch your tab to HOME before you shut down. EDIT - Thanks to Murph, another workaround is to go to a new workspace and then go back to the previous one and your Labels & Tables will be back. And to give further credit - this was discussed in the beta forum but I guess I either forgot about it or overlooked it.
Wednesday, April 15, 2009
Civil 3D 2010 - Download and install (Standalone)
I got to work this morning and did my daily check of emails and then onto my Autodesk subscription site to see if anything is new. finally, my Civil 3D 2010 download was there. So, I thought a quick blurb on the install would be in order. If you are not on subscription, then you will have to wait until your box(es) arrive.
So, first of all, the file sizes of the downloads are pretty menacing! Civil 3D 2010 is broken down into two self-executing files:
I would also highly recommend using the Download Manager that Autodesk provides. If you network crashes in the middle of the download, you simply reconnect to the subscription site and it will pick up form where you got dropped. Without this, you will feel the pain of starting the download all over again. To download the two files above, it took about 1.5 hours - YMMV depending on your internet connection.
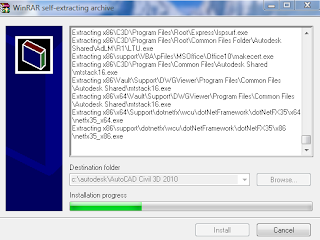
Double-click on the ....part1 file and now wait while it crunches and decompresses the install. For this part, mine took about 20 minutes.
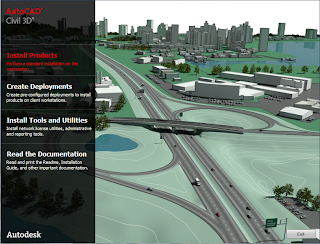
Now you are at the main install screen. You can install standalone, create deployments, install utilities and read documentation. I'm going to install as a standalone. Note: I have an install of Civil 3D 2007 AND 2009 on my machine already (why not 2008? - we decided as a company to to an 'every other year' install. so my users won't see 2010 until 2011 - company policy enacted)

So after I click on the Install, I am now asked to select the products I want to install. Since we are not a Vault shop, I disabled the Vault client.
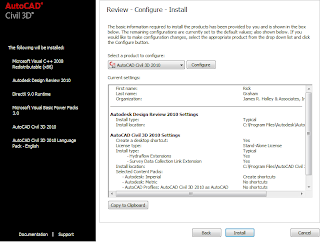
Clicking on Next shows you a summary screen of what you have already selected and gives you the opportunity to change any items that are not correct.
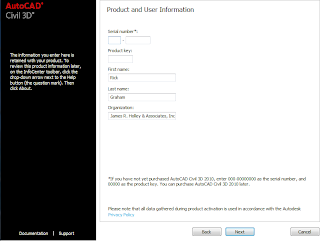
Clicking on Next takes you to the User screen. Here you enter in your product code and Product Key. The Product key is a new addition to 2010. Someone else might blog on this , but I am thinking that it is a a checksum to make 100% sure that your license is valid.

Clicking on Next takes you to the main install screen. Here, you might as well go to lunch or do something else because your computer will not be usable during that time due to the large amount of memory taken for the install (at least that is the case with me). It installs Visual C++, Resign Review 2010 (another blog post at a later time), DirectX, Visual Basic Power Packs, Civil 3D 2010, and Language Packs. Time for this part was about 55 minutes.
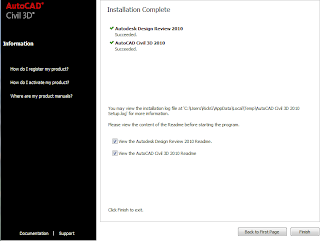
Finally! after all of this the installer is done and you must restart your computer.
So to recap:
So, first of all, the file sizes of the downloads are pretty menacing! Civil 3D 2010 is broken down into two self-executing files:
- AutoCAD_Civil_3D_2010_English_WIN_32bit.part1.exe = 3,906,250 KB
- AutoCAD_Civil_3D_2010_English_WIN_32bit.part2.rar = 675,180 KB
I would also highly recommend using the Download Manager that Autodesk provides. If you network crashes in the middle of the download, you simply reconnect to the subscription site and it will pick up form where you got dropped. Without this, you will feel the pain of starting the download all over again. To download the two files above, it took about 1.5 hours - YMMV depending on your internet connection.

Double-click on the ....part1 file and now wait while it crunches and decompresses the install. For this part, mine took about 20 minutes.

Now you are at the main install screen. You can install standalone, create deployments, install utilities and read documentation. I'm going to install as a standalone. Note: I have an install of Civil 3D 2007 AND 2009 on my machine already (why not 2008? - we decided as a company to to an 'every other year' install. so my users won't see 2010 until 2011 - company policy enacted)

So after I click on the Install, I am now asked to select the products I want to install. Since we are not a Vault shop, I disabled the Vault client.

Clicking on Next shows you a summary screen of what you have already selected and gives you the opportunity to change any items that are not correct.

Clicking on Next takes you to the User screen. Here you enter in your product code and Product Key. The Product key is a new addition to 2010. Someone else might blog on this , but I am thinking that it is a a checksum to make 100% sure that your license is valid.

Clicking on Next takes you to the main install screen. Here, you might as well go to lunch or do something else because your computer will not be usable during that time due to the large amount of memory taken for the install (at least that is the case with me). It installs Visual C++, Resign Review 2010 (another blog post at a later time), DirectX, Visual Basic Power Packs, Civil 3D 2010, and Language Packs. Time for this part was about 55 minutes.

Finally! after all of this the installer is done and you must restart your computer.
So to recap:
- Download from Autodesk Subscription = 90 minutes
- Decompression of files = 20 minutes
- Actual install of Civil 3D 2010 and associated files = 55 minutes
- Reboot computer = 2 minutes
Subscribe to:
Posts (Atom)

