Wednesday, April 15, 2009

Civil 3D 2010 - Download and install (Standalone)

I got to work this morning and did my daily check of emails and then onto my Autodesk subscription site to see if anything is new. finally, my Civil 3D 2010 download was there. So, I thought a quick blurb on the install would be in order. If you are not on subscription, then you will have to wait until your box(es) arrive.

So, first of all, the file sizes of the downloads are pretty menacing! Civil 3D 2010 is broken down into two self-executing files:
  • AutoCAD_Civil_3D_2010_English_WIN_32bit.part1.exe = 3,906,250 KB
  • AutoCAD_Civil_3D_2010_English_WIN_32bit.part2.rar = 675,180 KB
There is also a Vault specifically for Civil 3D 2010 available for download. If you are using Vault, MAKE SURE YOU ARE USING THE ONE DESIGNED FOR CIVIL 3D!!

I would also highly recommend using the Download Manager that Autodesk provides. If you network crashes in the middle of the download, you simply reconnect to the subscription site and it will pick up form where you got dropped. Without this, you will feel the pain of starting the download all over again. To download the two files above, it took about 1.5 hours - YMMV depending on your internet connection.


Double-click on the ....part1 file and now wait while it crunches and decompresses the install. For this part, mine took about 20 minutes.


Now you are at the main install screen. You can install standalone, create deployments, install utilities and read documentation. I'm going to install as a standalone. Note: I have an install of Civil 3D 2007 AND 2009 on my machine already (why not 2008? - we decided as a company to to an 'every other year' install. so my users won't see 2010 until 2011 - company policy enacted)


So after I click on the Install, I am now asked to select the products I want to install. Since we are not a Vault shop, I disabled the Vault client.


Clicking on Next shows you a summary screen of what you have already selected and gives you the opportunity to change any items that are not correct.


Clicking on Next takes you to the User screen. Here you enter in your product code and Product Key. The Product key is a new addition to 2010. Someone else might blog on this , but I am thinking that it is a a checksum to make 100% sure that your license is valid.


Clicking on Next takes you to the main install screen. Here, you might as well go to lunch or do something else because your computer will not be usable during that time due to the large amount of memory taken for the install (at least that is the case with me). It installs Visual C++, Resign Review 2010 (another blog post at a later time), DirectX, Visual Basic Power Packs, Civil 3D 2010, and Language Packs. Time for this part was about 55 minutes.


Finally! after all of this the installer is done and you must restart your computer.

So to recap:

  • Download from Autodesk Subscription = 90 minutes
  • Decompression of files = 20 minutes
  • Actual install of Civil 3D 2010 and associated files = 55 minutes
  • Reboot computer = 2 minutes
Grand total of 2 hours, 47 minutes. And we haven't even gotten into the customization part yet - perhaps another blog.

Tuesday, April 14, 2009

Civil 3D 2010 - Learning Resources

Today, we're going to continue with the Welcome screen that shows up when you first fire up Civil 3D 2010.


The Learning Resources will take you a screen with lots of stuff to explore, but many of them are repeats as shown below. It should be noted that almost all of these can also be accessed from the main screen help too:

1. User Interface - This is the same as the User Interface Overview as blogged from before.
2. What's New - This is the same as the New Features Workshop that will be blogged on next.
3. Moving from LDT - This is a valuable file for those whose minds are still wrapped around Land Desktop. It talks about why one should move to Civil 3D, Shows Civil 3D Features and Benefits overview and a suggested workflow as you transition from LDT to Civil 3D.
4. Tutorials - It goes through a logical sequence and builds upon each other as it goes along. It is HIGHLY recommended that the new user, old user, and users that think they already know it all view these. I cannot tell you how many times a message on the discussion groups can be answered by one going through the tutorials first!
5. Civil 3D Help - I have noticed that over the years, the help has actually become very - helpful! In Civil 3D 2010, the help is broken down into work processes called By Task, By Feature, and By Job Role.
6. Best Practices Guide - This is the same as the Best Practices Guide found on the Welcome Screen and will be blogged on later.
7. User to User Discussion - Clicking on this will open your internet browser (you DO have internet access, do you?) and opens up the Autodesk Discussion forums. for those who wish to bookmark this site, it's discussion.autodesk.com/forums/civilcommunity.jspa. This is my second home! I depend on this site alot for figuring out various problems and even help another one along the way. It is user-based, but there are also Autodesker's the appear there from time to time. One of the best resources in ym opinio - hands down. Having said that, a note of caution too. Since it is user-based, there may be times when the solution given is not the only one or even the right answer. So Caveat emptor!
8. Technical Support - Clicking on this will open your internet browser and opens up the AutoCAD Civil 3D Services and Support webpage. for those who wish to bookmark the site, its www.autodesk.com/civil-support. This site has improved over the years, but not as much as the previously mentioned help that is built into civil 3D 2010. for example, typing a search phrase in the Services and Support may NOt find your results, but typing in a single key word MAY find the result. The fuzzy logic for searching help is still fuzzy in my opinion.
9. Subscription - Clicking on the will open your internet browser and takes you to the Autodesk Subscription home page. For those who wish to bookmark the site, its www.autodesk.com/subscription. If you're not on subscription, then this won't do you any good. But if you are, its an easy link to managing your subscription, checking for latest software and other management items.
10. Training Programs - Clicking on this will open your Internet browser and opens up another page of the AutoCAD Civil 3D Services & Support. For the bookmark, its www.autodesk.com/civil-training. This lists the available training resources that are available to you. some of them, once again are repeats and some are not free resources, but they are training resources.
11. Events & Seminars -Clicking on this will open your Internet browser and opens up the Civil Engineering Community Events page. the bookmark is civilcommunity.autodesk.com/events. Here, you can check on any events that are happening in your area via the filters.
12. Skill Builders - Clicking on this will open your Internet browser but opens up 'The Page You Were looking for Was Not found' :-o. Doing some digging, here is the correct page. [Edit: The final release fixes this link]
13. Explore hundreds of free resources in Autodesk's user community - Clicking on this will open your Internet browser and opens up the Main Civil Engineering Community page. Here you find literally hundreds of resources dealing with Training, Blogs, Discussions, Online Resources and Events; all dealing with Civil 3D. As of this writing, the 2010 content is sparse (due to its not really out in peoples hands yet).

Wow, that went longer than I anticipated! But I hope that it helped you out and SIMPLIFIED your Civil 3D search.

Friday, April 10, 2009

Civil 3D 2010 - Getting Started Movies

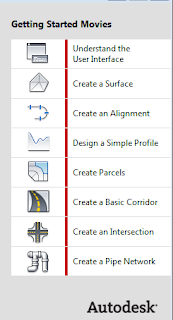
Today I want to continue on the Civil 3D 2010 Splash Screen. On the right-hand side of this screen, you'll see a series of Getting Started movies for you to view.

The following movies are available for you to view:
  • Understand the User Interface
  • Create a Surface
  • Create an Alignment
  • Design a Simple Profile
  • Create Parcels
  • Create a Basic Corridor
  • Create an Intersection
  • Create a Pipe Network
As you run your mouse over each of the options, you will see a short description under the Main Welcome screen of what the demonstration is all about.


Clicking on any of these will open up a new screen entitled Civil 3D Tutorial Animations.


Although the demonstration says there is no audio, a better description would be that there is no voice audio. The mouse clicks on each step gives a 'click' sound. I'm not sure why they would have wanted this. Also, it is my opinion that the movies are bit fast to view some of the text. There is no (current as of the version that I have) method of slowing down or pausing. [Edit: the release version DOES have a nice fast-forward, rewind and pause button]

The demonstrations are well done visually.

It's a version 1.0, so I'm sure there will be more improvements in future releases.

Tuesday, April 7, 2009

Civil 3D 2010 - User Interface Overview

I'm going to start blogging about some of the features of civil 3D 2010. When you start up Civil 3D 2010, a Welcome splash screen appears. On this welcome screen, there is a plethora of things that can be blogged on:
  • Getting Started Movies
  • User Interface Overview
  • Learning Resources
  • New Features Workshop
  • Best Practices Guide
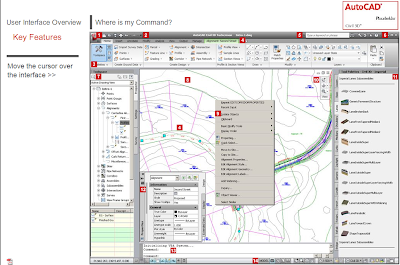
Today, I'm going to talk about the User Interface Overview. clicking on this brings up the help window but this window has lots of places to hover.


For example, by hovering over the number 3, information on the left-hand side will tell you that you are looking at the ribbon. If you click on the number 3, you will see an enlarged view of the ribbon.

This is a real nice addition to help the user interface newbie (which is probably most of us). Kudos to the team at Autodesk that developed this.

Making the old new - profile from single points

Yesterday my boss (who still lives and breathes grid paper) came up to me and asked if I could plot a profile from just a single shot of road enterline points that he provided. All he wanted was the centerline plotted. The road was a bit twisty in the plan view.

Knowing how he REALLY wanted me to do this (plotting points stationing and elevations would take an extraordinary amount of time), I thought that Civil 3D should be able to do this no sweat! I told him I'd like to give it go in Civil 3D. His response was "I don't care, just get it done".

So, knowing that a profile needs a surface and an alignment, I set to make the alignment. I did the old 'connect the dots' and then performed best fit lines and curves to establish a quasi-centerline. I also made a polyline from the point-to point shots with elevation.

Since I had points with elevations, I could create a surface from just those points, right? WRONG! The surface was disjointed and missing places where the surface deviated.

So, I knew that he only was concerned with the centerline and could care less about anything outside of that. But I needed a surface! So, I simply used the good old Feature Line Offset command! Remember that most of these Feature Line commands can also be used with polylines. I offset the centerline 10' to the right and left - just enough so that I could establish a surface. 

I then, created a new surface and brought in all three polylines as breaklines and voila! I had a surface! So creating the profile was a snap. I put a BIG NOTE on ym no-plot layer indicating what I had done and that it should NOT be considered as accurate in any way, shape or form! I do these no-plot notes to inform future designers who might look at my work 20 years in the future and know what my intnentions were. Just another one of my CAD Manager SOP for all drafter/designers.

So, the total time spent on this little project COULD have been hours. In Civil 3D, it took less than a half an hour! AND, I impressed my boss - guess that makes my day complete.

Thursday, April 2, 2009

Twitter Anonymous

Not anything to do with Civil 3D per se, but they say the first step is admission.

I admit it, I'm hooked on Twitter. I have the Chirpr on my gadget desktop at work and at home. It's almost like soap operas. Maybe it is the reason why Guiding Light is canceled after umpteen years of being on the TV.

When my internet is down at home, I start to sweat and palpitate from withdraw symptoms of twitter and internet in general. I pace the room and constantly mumble to myself about wondering what Lynn_Allen is up to and how civil3diva's speeches went. I unplug and re-plug in the router and cable modem box hoping to see the euphoric four lights blinking. My wife steers clear of me in these moments.

You can follow my gripes, comments, etc. by twittering to C3D_RickGraham.

I'll bet you that Twitter Anonymous t-shirts would sell good on CafePress.

FOUR Months!

Well, now that its a new year and FOUR months passed since my last blog entry I thought I would try to repent and have a go at it again.

To be fair, I have been busy doing other things such as co-authoring a book called Introducing Civil 3D 2010 with fellow author and good friend of Civil3d.com (James Wedding). This experience has been an eye-opening one. Although I'm not completely done yet, I can say I'm on the home stretch. I hope you all run out and pick one or two up when it comes out.

I have been busy in the beta field too. I have been on the Civil 3D 2010 and Impression 3 beta team. I really enjoy that process. not just because I get to play with the software, but more importantly my voice can be heard with issues/future developments. If you are interested in doing this kind of work, go to myfeedback and register!

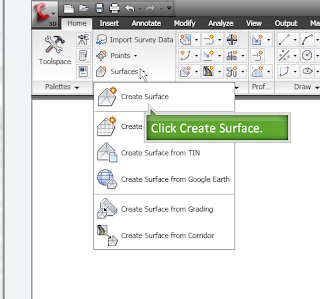
So what kind of little Simple tidbit can I leave you with that no one else has blogged about? Well, the pickings are slim! lol I will say that the new ribbon interface in 2010 is nice! Once you get to see and play with it, you will be more productive. The ribbon is designed with workflow in mind. If you are doing annotative stuff, you just click on the Annotate tab at the top and all your favorites for annotation are there.

The contextual ribbons are just shear genius! If you click on an alignment, the ribbon will concentrate on just items having to do with that alignment. when you are done with that alignment the ribbon returns back to normal. Its almost scary the AI built in!

Well, that enough for now. Hopefully I'll be blogging more now that things are starting to wind down a bit .